Your Straightforward Guide to Setting Up Your First Facebook Group Facebook Strategy Series
In the last post Facebook Group Strategies we looked into the opportunities and strategies around Facebook Groups. From your reactions I know that this post was well received. I won’t leave you hanging - the following is a guide to help you set up a Facebook Group.
In the beginning, Facebook had posts. Then it added pages for business. Later, groups were developed. Facebook groups are a way for businesses and others to connect with specific sets of people with specific interests. Groups allow you to share updates, photos, documents, and messages with other group members. Groups can be closed, public or secret.
Groups are a great way for businesses to connect and build lasting relationships. Facebook groups can be used in conjunction with a Facebook page since FB groups can be used as an additional marketing too, as a way to fuel your other marketing plans and a way to enable others to gather around your business.
Groups are often formed around things like books, business, swap shops, exclusive memberships related to hobbies or interests, or as support groups.
Setting up a Facebook group is straightforward. You’ll need to set up various options like the privacy settings and add a cover photo. Then you will need to know how to post and make certain posts pinned. You need to know how to invite new members and accept them in the group and how to moderate posts.
To get started you first need to set up your group.
How to create the group
Groups are one of the more popular features on Facebook. Setting up your first Facebook group can be fun and exciting. The group can be as narrowly or broadly focused as you want. For instance, it can be a group set up as an extension of your blog. It can be narrowly focused on a certain aspect of your business such as a certain type of diet or self-help for empty nester women. The group could be a place where your members share a hobby. Whatever the focus, keep the group true to it.
Begin by logging into your Facebook account.
From your home page, go to the Groups section on the left side menu and click on Create Group.
Click Create New Group at the top of the page. A new window will open. Here you will add your group name, add members, and select the privacy settings for your group.
Choose a distinct but simple name to make it easy for people to remember your group. You can change the name later if you want or need to.
You must add at least one friend to create a group.
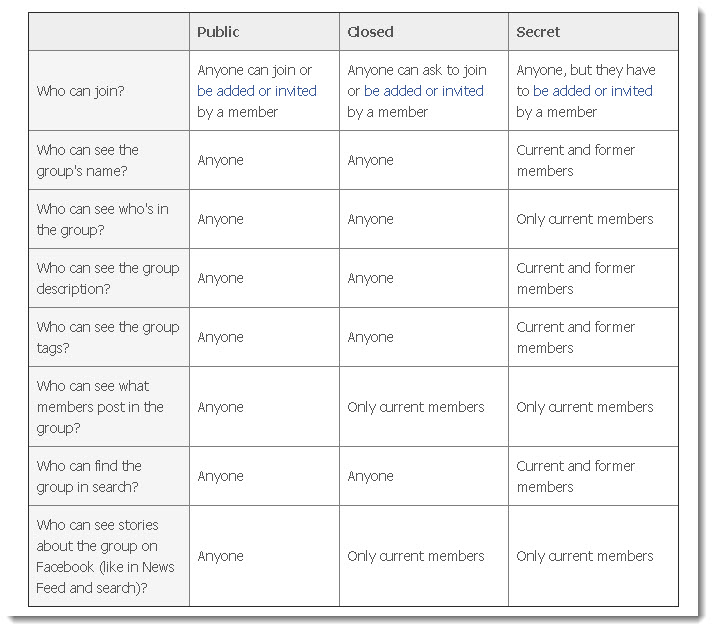
The privacy setting options are:
Public - anyone can join
Closed - you are asked to join or are invited by a member
Secret - anyone can join but must be added or invited by a member
Click Create when you’re done.
Once the group is created, you’ll be taken to the group.
Here you can personalize the group by adding a description, photos, and posts.
Click on Add a Description to add a description about your group. Include what members can expect from it. This is a good place to add “rules” for the group.
You should include a destination URL link to your website in your description. Use the format of http:/www.URL.com so your link is live and clickable.
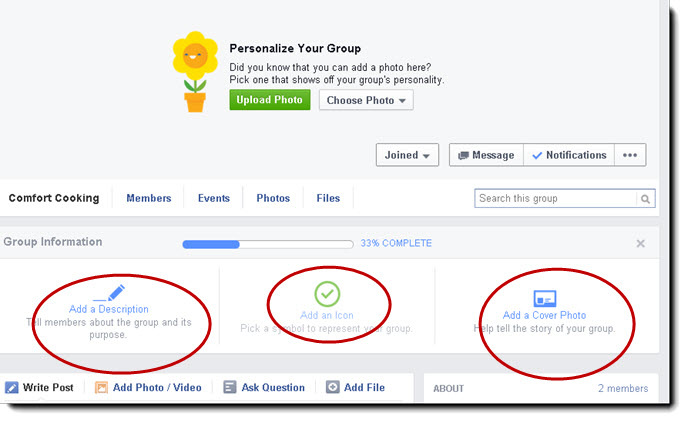
Customize your group page by adding an icon or symbol that represents your group and adding a cover photo that helps tell the story of your group.
Options
Now that you have your group created, you’ll want to customize it. Your group page can be customized so that it relates to your topic and your members. You want your group to be easily recognizable and fun for members. The admin area is where you set permissions for privacy, users, add a description, and change photos.
Should you add a cover photo? That depends. You have 3 options for images:
- Use images of your group’s members
- Use a photo already uploaded
- Upload a photo
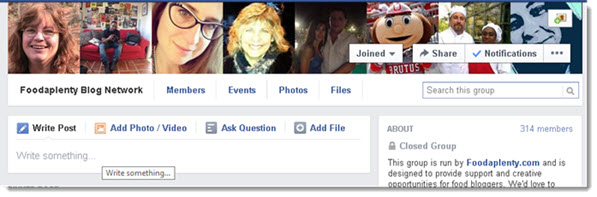
The default for a Facebook group photo cover is a combination of the member’s profile photos. This gives a more personalized look to the page but many groups might opt to change the cover photo to an image that represents the group as a whole.
Here is an example of using members profile images for a group cover image:
If you want to add your own image:
To add an image, click on the more icon (the three dots). Then click on manage your group.
Then click on the Add a cover photo. Here you can upload a photo, choose a photo already uploaded to the group
Adding a cover photo allows you to set the tone of the group by having an image that directly relates to the group’s subject matter.
Click on Upload photo or Choose photo. Choose whether you want photos from your photos or from the group photos.
Choose the image you want. Drag the image to the position you want. Click Save Changes.
You can change the group photo later by moving your mouse over the cover photo, clicking Change Group Photo button and choosing Upload a Photo.
The option to have a certain photo that shows what the group is about or to leave the default of having your group’s avatars show is purely a personal choice. When choosing your image, think about how it reflects on the message your group has.
Editing group options:
 Under the edit group options, you have several choices. To see them, click on the more buttons (three dots) and then click on Edit Group Settings.
This is where you can change your privacy setting for the group.
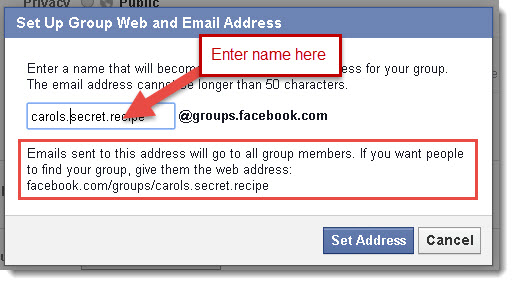
You can also set up a group address, change the description, and add tags.
The Group address is where you can give the group a custom URL as well as an email address where members can email the group directly.
Add tags that help people find your group. Under Tags, add words that describe what your group is about (ex: soccer, music, travel) and then click the suggestions that appear in the dropdown. Click on save.
Choose the posting permissions you want. You may want to allow members and admins to post to the group. Another alternative would be to allow only admins to post to the group.
Choose how post are approved. Click Save.
Choosing the options that work with your group can help prevent spam posts, will keep people from uploading photos without your permission and help non-members find your group.
How to post
Once you’ve set up your group, you will need to determine how you are going to post and who will be allowed to post. It’s a good idea to have a pinned post that states your rules for using the group. Include the policy about members posting promotional items. Be specific about where, what, and how, if it is allowed.
To create a post:
Click in the area under Write Post to add a text post. Enter your text and click Post.
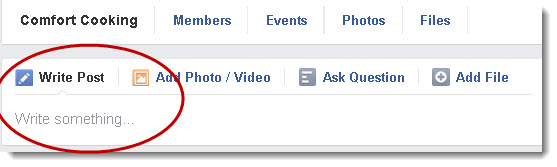
You can also add photos, videos, ask a question, or add files from your computer or Dropbox.
In a group, the latest post with activity will sit at the top of the newsfeed. Each time someone posts a post it appears at the top. When someone comments on another post, it then jumps to the top. This keeps information moving quickly, especially in large groups.
One way to keep pertinent information at the top is to use a pinned post.
Pinned posts
Pinned posts are posts that appear at the top of your groups feed, no matter how many new posts are added.
Admins can pin one post to the top of their group. Often this post contains information on how to use the group, what’s allowed and important links.
To pin a post:
Log in to your account. Go to your group.
Click on the write post to create a post. It has to be posted before you can pin it. You may also go to a post that has already created in the group. Hover over the post and click the dropdown arrow. Click on the pin post link.
You can unpin a post easily. Repeat the above steps, selecting Unpin Post from the list.
Events
You can set up specific events in for your group members to attend.
To create an event for your group, go to the group and click the More-button, three dots, in the top right. Then select Create an Event from the dropdown menu.
You will need to choose the privacy option for the event.
To adjust the privacy settings for your event:
Choose a setting from the privacy dropdown
Click Save or Create
Events have different privacy settings available to the host:
- Public allows anyone to join the event without an invitation.
- Open Invite allows friends of guest to join without an invitation.
- Guests and Friends allows only those invited to join the event.
- Invite only allows only people invited by the host to join the event.
- Group only is an event created within a group by the admin or members.
Posting in groups is like posting on your Facebook timeline. You can pin certain posts so they are always at the top of your group so your members can easily find them. When creating events you need to select the privacy settings for who you want to attend the event.
Accepting members
Without members, your group will be stagnant. You should decide how you are going to accept members and who can invite members.
One way to get members is to invite them to join your group.
To add new members to a group:
 Go to your group.
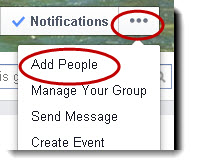
Click on the more button. Click on the Add People field.
A new box opens. Enter your friends’ names and click on them to add them to the group.
For each of the groups—Public, Closed, and Secret, group members can add their friends. Everyone can request to join but each must be confirmed by the group admin.
Approving Members
As the admin for a group you can choose who you want to approve to join your group.
To get started:
Click on the more tab. Select Edit Group Settings.
Choose the Any member can add members, but an admin must approve them option.
Click Save at the bottom of the page.
Once membership approval is turned on, only admins can approve people’s requests to join the group. Members can still add friends to the group, but the friends will need to be approved by the admin.
You can invite people to join your group but try not to add members without their permission first. One way to invite members is through messages or email if you are friends with them already. Another way is to invite new members through your blog.
 As the group admin, you can block abusive members.
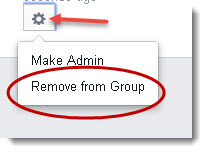
You can do this by clicking on Members at the top of your group.
Find the member you wish to remove and click the gear sign beneath their name. Select Remove from Group.
To block a member you’re removing, check the box that says Block Permanently.
Click Confirm to finish.
Note: Only admins will see the gear beneath a group member’s name. Admins are the only ones who can remove or block group members.Getting people to join your group means adding them and inviting them to join. As the admin of the group, you have control over who joins as well.
Moderating posts
As the owner of a Facebook group, you want group members to post comments and photos regularly. One problem might be inappropriate content. The best way to avoid this is with moderation of the groups’ posts.
The admin status allows you to monitor and remove any harmful posts. You can assign other members to be an additional admin to help moderate the group as well.
- Check you groups main page regularly.
- Delete any abusive posts or those that aren’t relevant content to your group.
- Remove comments that are abusive by clicking the “X” next to it.
- Remove posts by clicking the down arrow next to the post and selecting Delete Post. You can also select Report/Mark as Spam to report spam or abusive posts to Facebook.
- Set up additional admins in the group. To do this:
Click Members
Click the gear icon under the name of the member you wish to add as an admin.
Click Make Admin.
These people will be able to remove members or admins, add new admins and edit your group settings, so choose only members you know and trust to be admins.
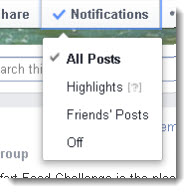 You can stay connected with what’s happening in your group by turning on notifications. Set it to receive all posts, highlights, or friends’ posts only.
Moderating your group will require you to visit your group page often and to follow up with comments.
What’s next?
Now that you know how to set up your Facebook group using this straightforward guide to setting up your first Facebook group, you can begin setting up groups for different areas of your business. You can quickly set up your group and add a description of what the group is about. Then, it’s a matter of inviting friends to join, posting relevant content, and enjoying being a part of the group.
I hope this guide helped you to set up your first Facebook Group!
Please tell us about your experience in the comments!
If you would like to receive this guide as a free download, Join the BlueBird Chirps Mailing list and receive a copy in the next monthly newsletter!
@bluebirdbc
Latest posts by Frithjof (see all)
- The Three Faces of Facebook - August 12, 2015
- Writing a Good Testimonial - March 9, 2015
- Some Words Have More Power Than Others - February 23, 2015


